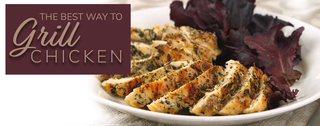
The Best Way to Grill Chicken

Summer afternoons, warm and sunny, are best spent outside with the grill fired up. You usually can't go wrong with the classic burgers and hot dogs, but if you or someone you're cooking for wants something a little healthier, you can throw on a boneless, skinless chicken breast and get it grilling.
Prepping Your Chicken
The size of your chicken matters. You want thin breasts, about 2 inches thick. If they are thicker than that, you can seal them up in a plastic bag and make them more even by beating them with a fist or a rolling pin. The plastic bag is just to ensure chicken juices don't go all over the place and it makes for an easier cleanup. The thickness of your meat should all be pretty uniform, so you can cook them evenly at the same time.
When getting your chicken ready to be grilled, you have a few options depending on how much time and effort you want to put into having the best tasting chicken possible. The most involved option is brining the chicken. This is a process where you soak your chicken in a mixture of water, salt, sometimes sugar, and spices you want to flavor your chicken. Any one of these is optional, but if you do decide to use spices, boil your brine for about three to five minutes and then let it cool before adding the chicken. Boiling the brine helps draw the flavor from the spices so they can be absorbed by the chicken. Place your chicken in a refrigerator safe container and then dump the cooled brine over it, making sure that the chicken is covered entirely. Cover the chicken and leave it in the fridge for at least 30 minutes. The longer you leave the chicken in the brine, the better it will taste, with one to two hours being a good ballpark for great tasting meat.
A quicker way to flavor the chicken is to rub the chicken down with olive oil and then seasoning it with whatever spices or seasoning blends you have picked. The olive oil will help your seasonings stay on the chicken while simultaneously preventing your chicken from sticking to the grill. This method doesn't require that the chicken sit to absorb flavor for any specified amount of time.
Another option to get a good juicy chicken breast is to dry brine it, which is essentially putting salt on the chicken and giving it some time to work its magic. This may seem counter intuitive- put salt on chicken to make it jucier? How dry brining works however is that it draws the moisture out of the chicken through osmosis. The salt dissolves into the juices and it is reabsorbed into the meat, where it begins to break down tough muscle proteins and helps tenderize the meat. Of course, the dry brine can include other spices and seasonings too, but the salt is a must. This method works best if you have 6-8 hours to let your chicken sit before you start cooking it. Dry brining in the morning before you go to work would be perfect for this method.
Chicken at 150°
Food safety is a huge concern for anyone who eats meat. If your meat is undercooked, you risk your health, but if it is overcooked you risk having a disgusting dinner. Neither of these are good. Chicken breast is notorious for being frequently overcooked on the outside and done just right in the center. This is because we tend to cook chicken at a very high temperature quickly, under the guise of destroying all the bacteria and making our food safe to eat.
The truth is that food safety guidelines, which mark chicken safe to eat at 165°, are standard and easy across the board to understand so chefs of all skill levels can follow them and not inadvertently kill anyone. Really, food safety is dependent on temperature and time, something food safety guidelines give very little consideration.
Cook your chicken at 145°-150° for the right amount of time and you will hit the right internal temperature without compromising the moisture of the meat. Sure, you can make sure your chicken hits 165° and the bacteria will die instantaneously, but at 145° it only takes 9-10 minutes to kill the bacteria. At 150° it takes 2-3 minutes. For reference, the FDA recommends that for every 10 million bacteria on the chicken, that only one survives after it has been cooked. At 140° it would take 27-28 minutes to kill off this much bacteria. Stick to that sweet spot between 145° and 150° for the best, most moist chicken. Cooking with heat less than that will give you a chicken breast that is almost raw in texture, which is both gross and unappealing. It must be noted that these temperatures are what the internal temperature of the chicken breast should reach before it can be removed from the grill. It will take some time for your chicken to reach the right heat, and it will take another 9-10 minutes of cooking before the chicken is safe to eat. Be sure you are paying attention to internal temperature and time as you are making your chicken breast.
Heat it Up
Once you have decided the temperature you want to cook your chicken at, it is time to throw it on the grill. If you went with either of the bringing methods to season your chicken, you could oil it to make sure that it doesn't stick to the grill. If you went with the oil and spices method, this is an unnecessary step. When grilling over gas or charcoal, you are cooking over a source of direct heat. If your griller is two or three flame, turn one of them off. This will help your chicken cook more evenly, so the heat won't be as intense. Keep your lid closed to keep the heat in, and check your chicken every 4-5 minutes, flipping every time, until it is done. If your chicken is looking well done on the outside, but the inside temperature still hasn't reached where you would like it to, move it to a cooler part of the grill so the inside can keep cooking without the outside becoming overcooked. When you remove your chicken from the grill, the internal temperature will keep rising briefly before it starts cooling, so let it sit for a few minutes.
Now you have no excuse for making a mediocre boneless, skinless chicken breast. Here we have given you the tools to make some of the best chicken you will ever have, so get out there and experiment. Anyone who tastes your chicken will be impressed, and you will be happy with you results!
Related Posts
The 10 Secrets to Backyard Grilling
The Best Vegetables for Grilling
The Difference Between Smoking, Barbequing and Grilling

